Deadline Spot Event Plugin How To Guide
Table of Contents
The Spot Event Plugin for Deadline allows Deadline to spin up fleets of render workers on AWS using EC2 Spot.
Prerequisites⌗
You’ll need an AWS Account, and an AMI with Deadline Worker and rendering software installed. Here is a guide to installing Deadline Client on Linux if you don’t have one already.
AWS configuration⌗
Create IAM User⌗
This section covers giving Deadline access and permissions it needs to manage resources in AWS.
Create new IAM user
Create access key
Access keys are how Deadline authenticates to AWS. Handle them with care as if they were passwords and don’t publish or share them.
Save the AccessKeyId and SecretAccessKey somewhere safe like keepass, we’ll need them for later.
Attach policies
Policies say what IAM users can and can’t do in AWS
AWSThinkboxDeadlineSpotEventPluginAdminPolicy and AWSThinkboxDeadlineResourceTrackerAdminPolicy
There are 2 extra policies we need to add that are not in the documentation, IAMReadOnlyAccess and AmazonEC2ReadOnlyAccess. Without them you will get an error when launching the Spot Event Configuration Utility.
Create IAM EC2 Role⌗
Create spot worker IAM role.
First create a new policy document that allows the role to be assigned to EC2.
Create a new role that will give the EC2 render workers the necessary permissions.
Create an instance profile so the role can be attached to an EC2 instance.
Attach the spot worker policy to the new IAM role.
Create Resource Tracker IAM Role⌗
Start with creating the trust policy file.
Create a new IAM role.
Add policies to the IAM role.
Spot Fleet Tagging IAM Role⌗
This is supposed to be automatically created by Deadline, but I don’t personally like the idea of giving Deadline the ability to create any IAM role it wants. So let’s create it manually instead.
Like before start with creating the trust policy file.
Create the new IAM role.
Attach policies to the IAM role.
Deadline Configuration⌗
Enabling Spot Event Plug-in⌗
Open the Deadline Monitor
Enable Superuser by clicking in the top menu Tools -> Super User Mode
Then open Tools -> Configure Events…
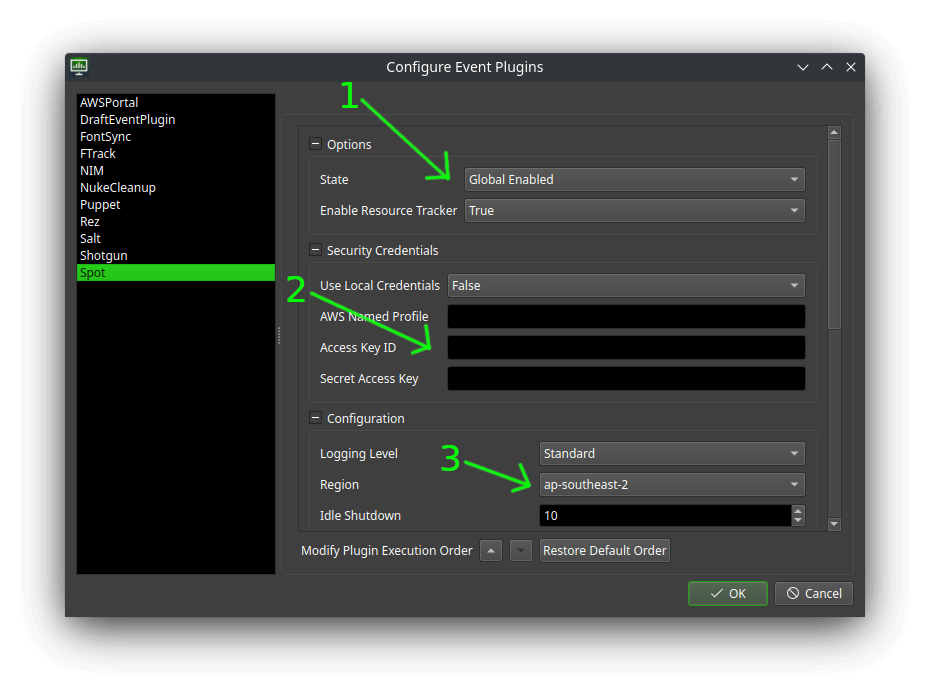
From the list on the left hand side select Spot.
- Set ‘State’ to ‘Global Enabled’ and ‘Enable Resource Tracker’ to ‘True’.
- Put your AWS Access Key and Secret here.
- Set the region to where you want rendering to happen, ideally a region geographically close to you.
Configuring Spot Fleets⌗
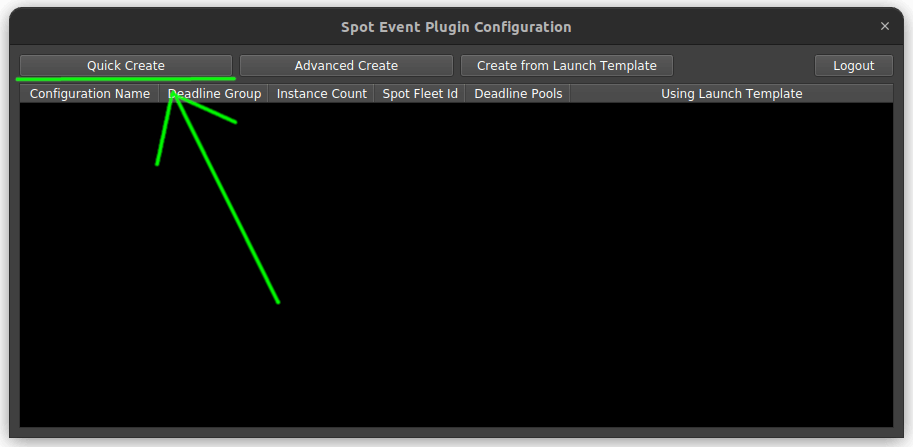
In the Deadline Monitor top menu bar go to Scripts -> Configuration -> Spot Event Configuration Utility.
Click on ‘Quick Create’
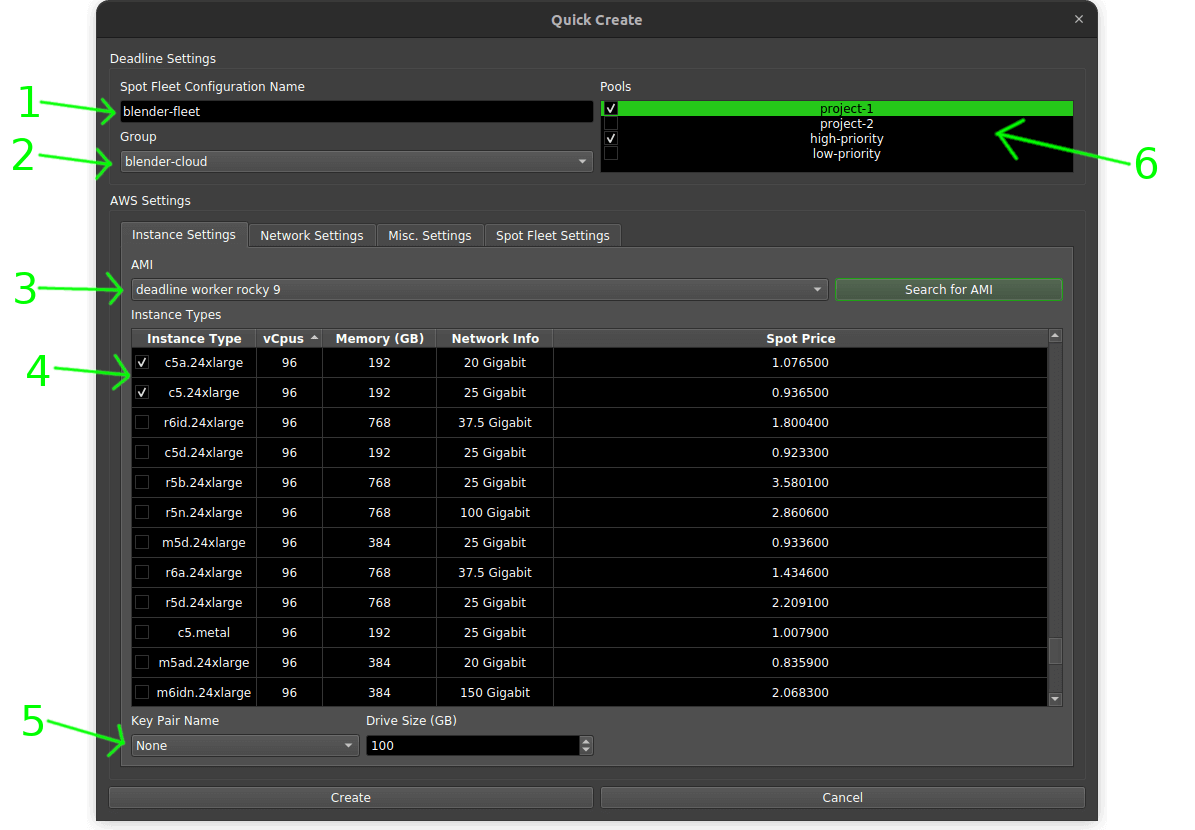
This will open the ‘Quick Create’ window where you can configure your spot fleet.
- Give the spot fleet a name to make it easy to identify.
- Select the group. When a job is submitted to this group it will trigger the spot event fleet creation.
- Select IAM to add the worker to.
- Select instance types.
- (Optional) Choose a key pair so you can access the works via SSH if needed.
- Select pools to add the worker to.
Learn more about how Pools and Groups work here.
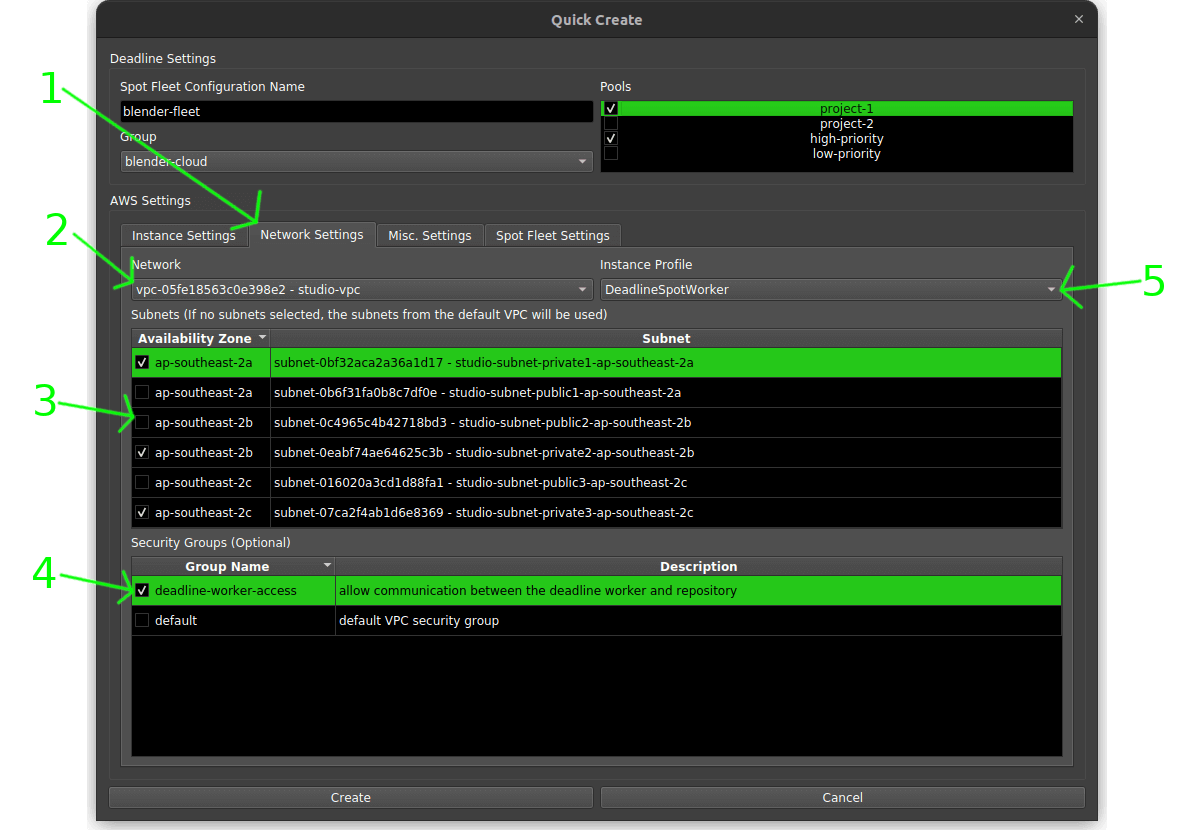
- Switch to ‘Network Settings’ tab.
- Select the VPC to launch the render workers in.
- Select subnets to launch the render workers in. Highly recommend launching in private subnets only and selecting at least 1 subnet from each availability zone to spread out the render workers to reduce interruptions.
- Select security group that allows the workers network access to any resources they need.
- Set the instance profile to ‘DeadlineSpotWorker’ we made here.
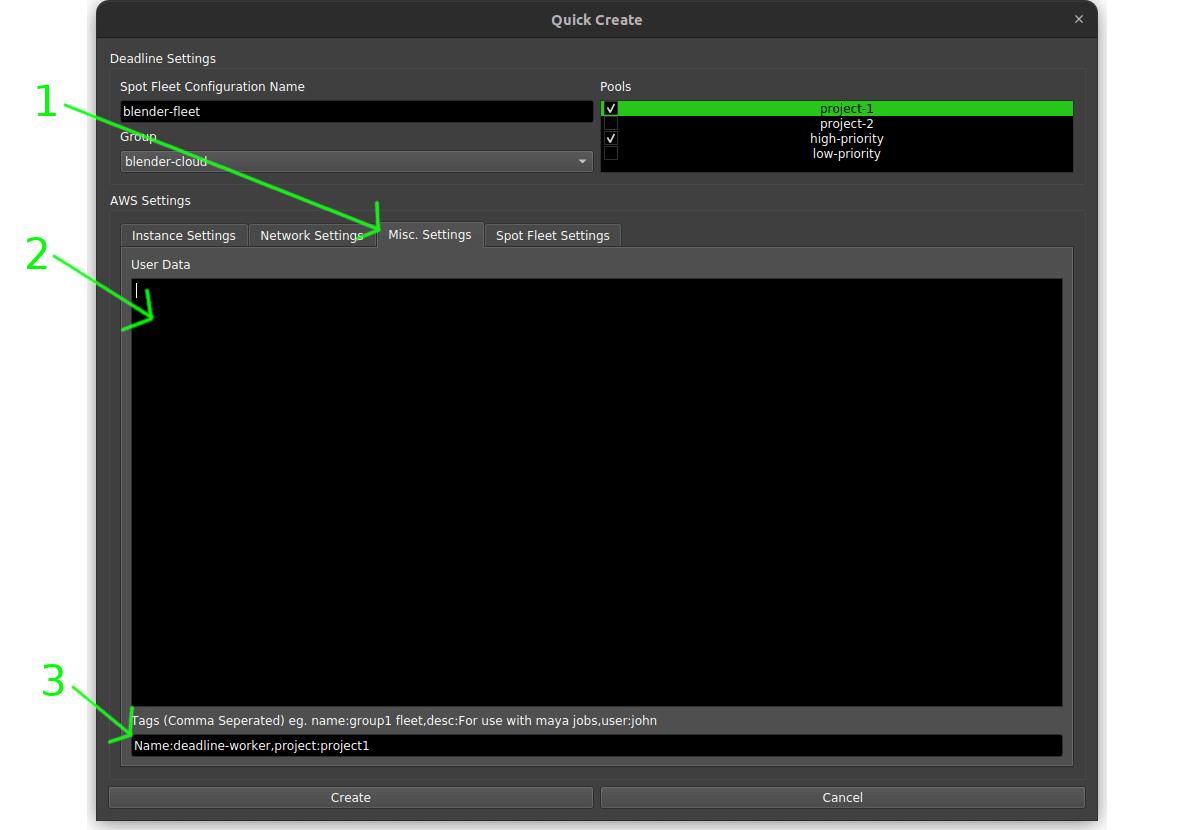
- Switch to ‘Misc. Settings’ tab.
- (Optional) Add a start up script here.
- Add tags. Highly recommend setting at least a ‘Name’ tag to make the render workers easy to identify in the AWS console.
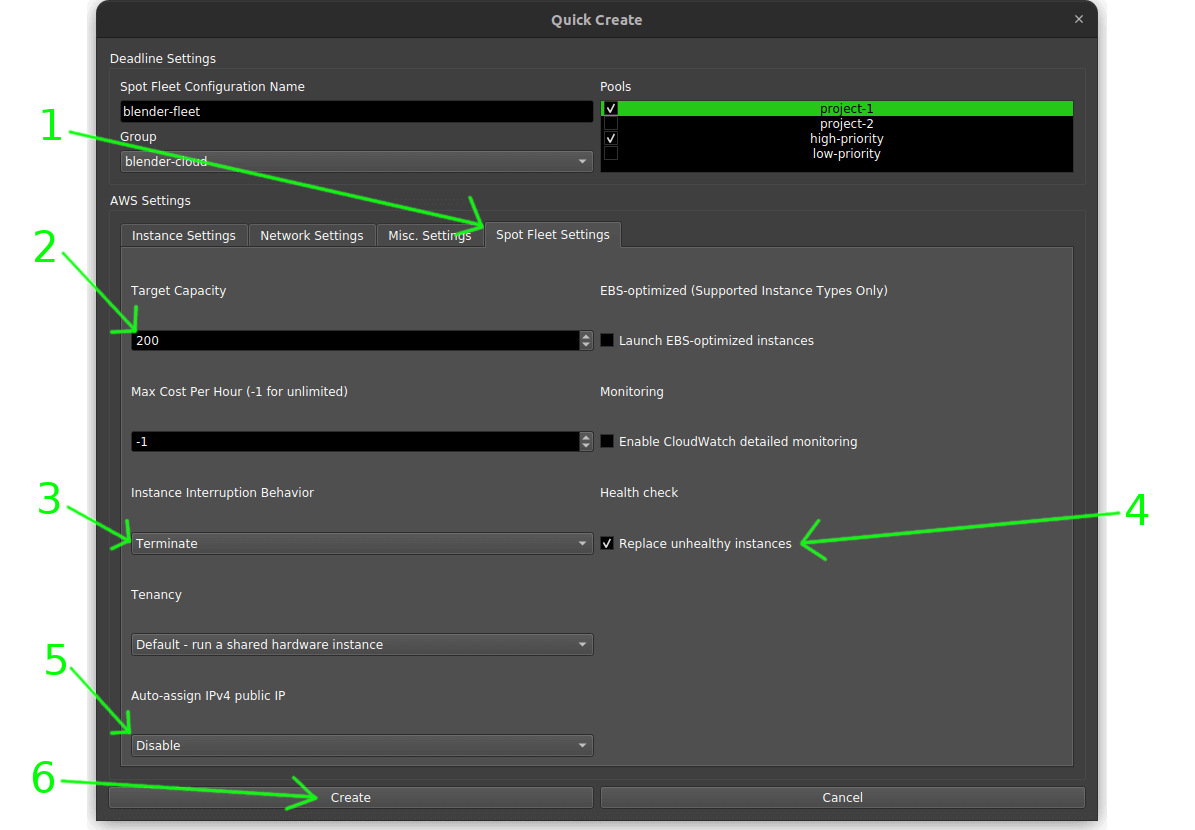
- Switch to ‘Spot Fleet Settings’ tab.
- Set how many render workers you want to launch in the spot fleet.
- Make sure it is set to ‘Terminate’ any instances when complete or interrupted.
- (Optional) Tick ‘Replace unhealthy instances’ so new instances are started if any are interrupted.
- Select ‘Disable’ auto assign public IP as render workers should never have direct internet access.
- Click the ‘Create’ button to create a new spot fleet.
Troubleshooting⌗
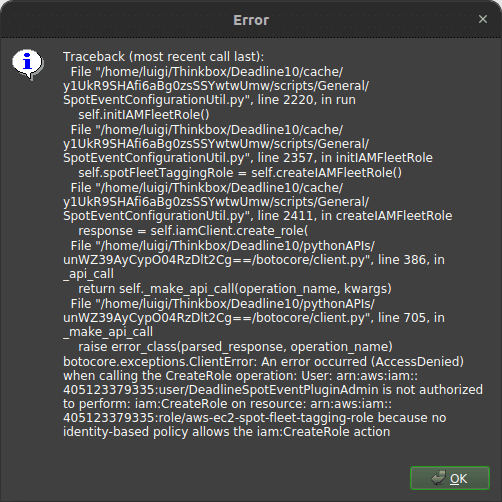
If you get this error when opening the ‘Spot Event Configuration Utility’ it means Deadline cannot create the IAM role it needs to manage the spot fleet. Here is the guide to manually add the role.
