Deadline Portal on Linux Setup
The purpose of the Deadline Portal is to provide a (relatively) easy way to expand a physical Deadline render farm into the cloud. This is often referred to as a hybrid render farm.
Portal handles transferring of assets and managing of worker fleets.
Where you should use it
- Need to burst quickly in the cloud.
- Small projects with < 500GB of assets (depending on internet connection).
- Don’t have an existing way of syncing assets to the cloud.
- Usage based licensing (pay by the hour).
Where it should not be used
- Large projects with lots of data.
- Projects with sophisticated asset dependencies.
- Want to use a cloud provider other than AWS.
- Not all plug-ins supported by Portal.
It’s not perfect, but if your in a pinch and need to get a project out fast it could save you!
Getting started⌗
How to set up Deadline AWS Portal on a dedicated Linux server.
AWS Portal has quite a few moving parts, so to keep things simple this guide will focus on the following.
- Portal installation
- basic configuration
- creating a worker fleet.
If you want to learn more about the Portal and hybrid cloud rendering Here is the link to the offical documentation
Prerequisites
This guide assumes you already have the following
- Deadline Repository with RCS. Here is the guide to set one up
- Linux server to install the Portal
- AWS account
Using the AWS CLI⌗
The easiest way to get up and running with the AWS CLI is to use the Cloud Shell in the AWS Console.
There are other ways of setting up the AWS CLI which you can find here
I am using v2 of the AWS CLI in this guide.
IAM User⌗
The Portal needs to be able to access AWS resources on your behalf to automate the deployment and management of the cloud render farm.
Admin user
Admin user account is for Portal to do the initial set up of all the things it needs in AWS. It can be deleted after the set up is complete.
Create new IAM user
Create access key
Access keys are how Deadline authenticates to AWS. Handle them with care as if they were passwords and don’t publish or share them.
Save the AccessKeyId and SecretAccessKey somewhere safe like keepass, we’ll need them for later.
Attach policies
Policies are what control what IAM users can and can’t do in AWS
Portal user
Portal user account is for the management of fleets and other resources Deadline will use when running render jobs.
Create new IAM user
Create access key
Like with the first access key make sure to save this one somewhere safe.
We need to attach 2 policies, AWSThinkboxAWSPortalAdminPolicy, and AWSThinkboxDeadlineResourceTrackerAdminPolicy, to the newly created IAM user.
[!Hint] search for IAM policies using CLI
Install AWS Portal Server⌗
Prerequisites⌗
Ideally installed on its own virtual server since it needs to be always on (or at least on when any rendering is going to happen).
Needs access to Deadline Repository and file server where assets are stored
Needs Deadline Client installed on the same server. Link to instructions here
Download and extract⌗
Run installer
Note
If you get an error like this.
Error: There has been an error.
Missing DEADLINE_PATH environment variable.  Please ensure that Deadline is
installed.  If you just installed Deadline from this console, then please try
running this installer in a new console. If installing with sudo, add '-E'
option to sudo.
Press [Enter] to continue:
The environment variable that points to the Deadline Client is missing. This should have been set by the Deadline client installer, if you have only just installed the client either reboot or set the environment variable manually to point to the
binfolder in Deadline’s installation directory, then try installing again.
----------------------------------------------------------------------------
Welcome to the AWSPortalLink Setup Wizard.

----------------------------------------------------------------------------
Please read the following License Agreement. You must accept the terms of this
agreement before continuing with the installation.

Press [Enter] to continue:


Do you accept this license? [y/n]:
Accept the EULA to continue.
----------------------------------------------------------------------------
Select the components you want to install; clear the components you do not want
to install. Click Next when you are ready to continue.

AWSPortalLink [Y/n] :

AWSPortalAssetServer [Y/n] :

Is the selection above correct? [Y/n]:
We want to install both AWSPortalLink and AWSPortalAssetServer together.
press enter x3 times
----------------------------------------------------------------------------
The directory where AWSPortalLink will be installed.

Installation Directory [/opt/Thinkbox/AWSPortalLink]:
press enter
----------------------------------------------------------------------------
Portal Link Public IP Override (Optional)

Override the IP address that AWS Portal accepts traffic from. If left blank, we
will use the automatically detected IP: '13.55.198.10' .

Portal Link Public IP Override (Optional) []:
----------------------------------------------------------------------------
The directory where AWSPortalAssetServer will be installed.

Installation Directory [/opt/Thinkbox/AWSPortalAssetServer]:
press enter
----------------------------------------------------------------------------
AWS Identity and Access Management (IAM) Resource Creation

AWS Portal requires IAM resources in your AWS account to operate.
Create these IAM resources:

[1] Automatically now: Requires your Administrator AWS credentials.
[2] Manually later: Run a resource creation script after the installer completes, or create the resources manually.
Please choose an option [2] :
Since we have already set up the admin IAM user we can choose option 1 to set up the resources in AWS now.
press 1 then enter
Learn more [Y/n]:
This will give additional explanation of what resources will be created in your AWS account.
press n then enter
See the IAM resource creation script [Y/n]:
This will print the entire resource creation script to the terminal. This is purely for transparency and not needed for installation.
press n then enter
----------------------------------------------------------------------------
AWS Credentials

Please enter your Administrator AWS credentials.

The installer will use these to create IAM roles and users for AWS Portal and
the Asset Server in your account.

AWS Access Key ID []:

AWS Secret Access Key :
Enter the AWSPortalAdmin key saved earlier.
----------------------------------------------------------------------------
AWS Portal Asset Server Root Directories

Please enter the roots of all directory structures (eg. the root of a file
server) the asset server should have access to. Files in directory structures
not listed here cannot be used to render with AWS Portal. If you need more than
3 directory structures, or need to change them later, please use the Asset
Server Settings dialog in the Deadline Monitor (Tools > Asset Server Settings)

Directory 1 []:
Deadline needs to copy things like 3D models, textures, and other files needed by the renderer to the cloud. To do that Portal needs to know where those files are kept and be able to access them.
Enter the paths to any shared drives or file servers where you keep the assets for your projects.
This can be changed later in the Deadline Monitor. So if you are unsure or want to do this later just press enter to continue.
----------------------------------------------------------------------------
Setup is now ready to begin installing AWSPortalLink on your computer.

Do you want to continue? [Y/n]:
press enter
Troubleshooting⌗
Running the AWS Portal Link service requires an open file descriptor limit (ulimit -n) to be increased. This value limits the number of active network connections that AWS Portal Link can have at a time. We have increased it to our recommended value of 65535, from the default of 1024.

You can change this limit in

/etc/init.d/awsportallinkservice

after the installation has finished, but the AWS Portal Link service will have to be restarted before it recognizes the change. Refer to the Deadline installation documentation for more information on resource limits.

Do you wish to continue? [Y/n]:
If you get this error you’ll need to restart the Portal services after the installation. Or just reboot the system.
Clean up⌗
Don’t forget to expire the admin user’s access key since we don’t need it anymore
Configure Deadline AWS Portal⌗
To configure the AWS Portal, start by opening the Deadline Monitor.
Tools -> Super User Mode

View -> New Panel -> AWS Portal
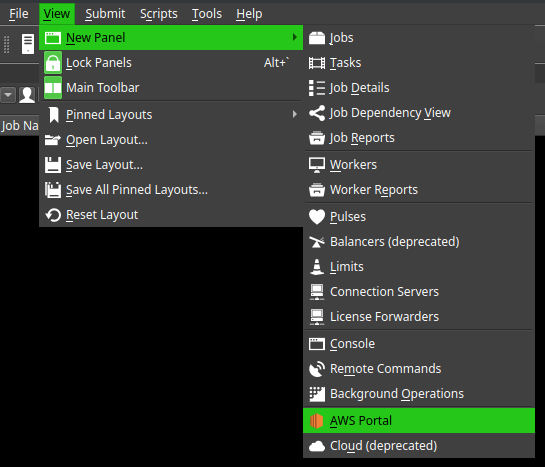
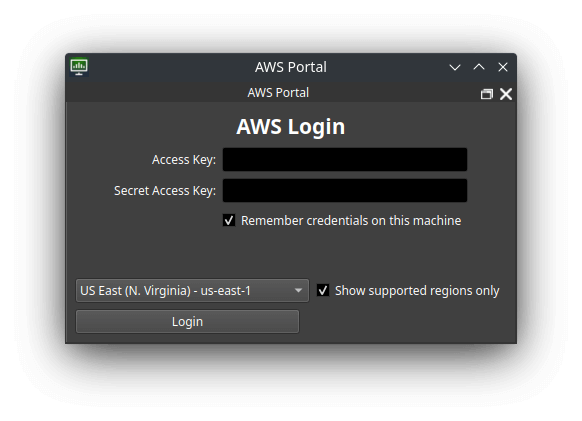
Portal will ask for the AWS access key for the AWSPortal IAM user created in this section.
Enter the access key and secret key to continue.
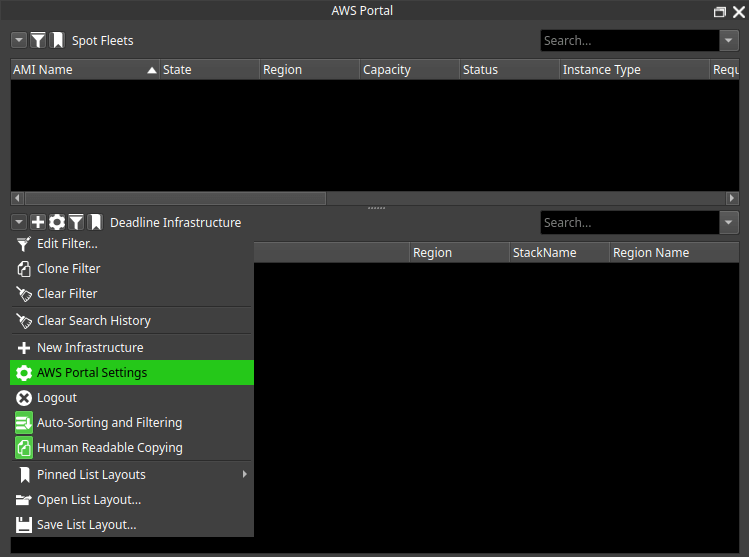
The AWS Portal panel will appear. Open the AWS Portal Settings.
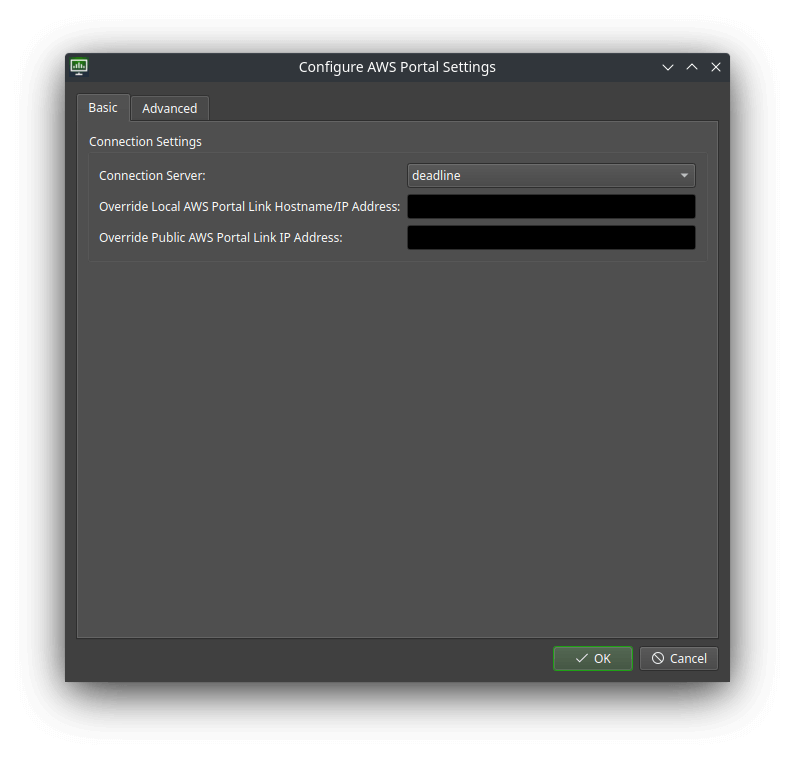
Set the Connection Server to your newly created Portal server. Then click OK.
Next we need to configure the asset server settings.
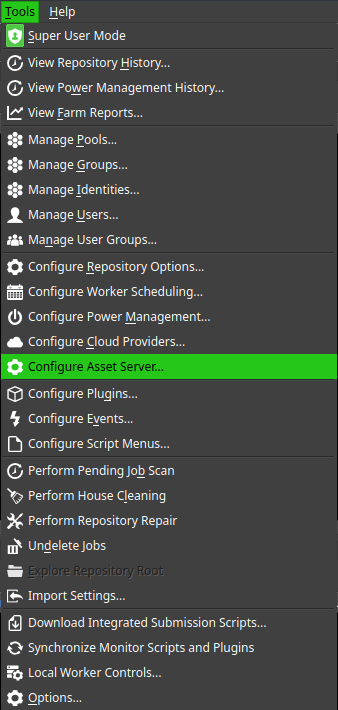
Tools -> Configure Asset Server…
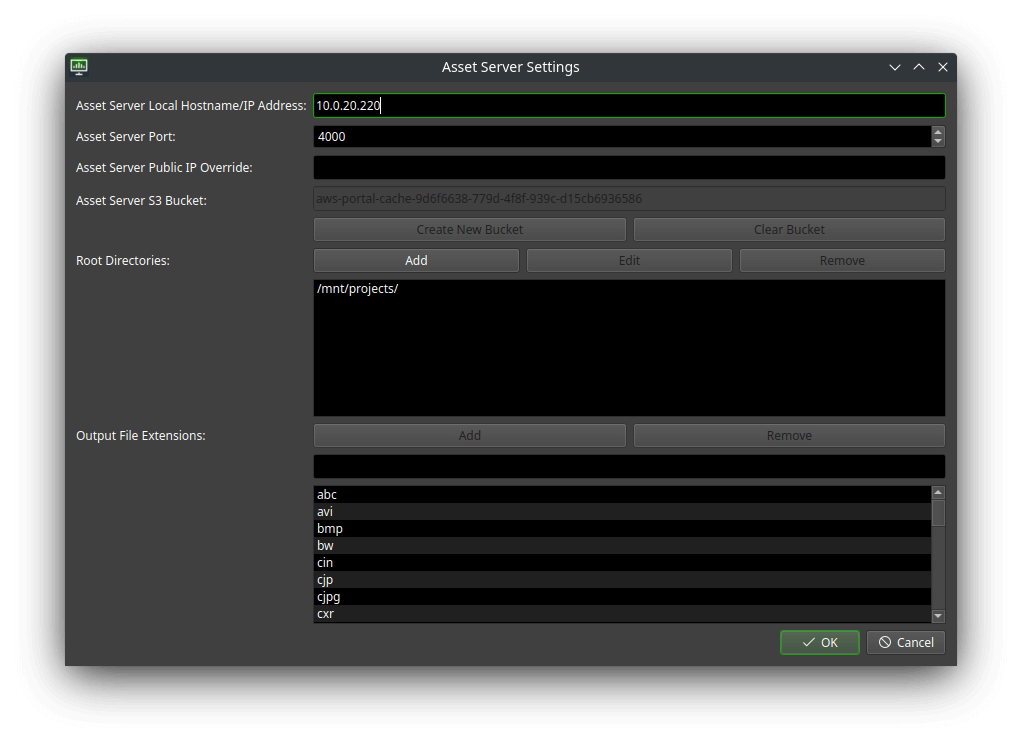
The settings should have been auto populated, check to see if the IP address matches the one for your Portal server.
Continuing set up of AWS Portal⌗
Here is where this guide finishes, you now have a working Portal server ready to be configured for hybrid cloud rendering.
There is much more to be configured and many more settings you can play with. To continue configuration see the official guides here.