AI Coding With Cline And Amazon Bedrock
Table of Contents
Cline is an AI coding assistant that runs directly in VS Code, capable of writing, editing, and executing code while you watch. However, Cline is just an AI agent and cannot act alone - it needs to connect to an AI model to work.
Amazon Bedrock provides access to AI foundation models through a simple API, perfect for powering AI assistants like Cline.
This guide will walk you through setting up Cline to work with Amazon Bedrock, giving you access to models like Claude 4.5 Sonnet to help you with your programming.
What you’ll learn:
- How to set up Amazon Bedrock API access
- How to configure Cline to work with Bedrock
- Best practices for getting the most out of AI-assisted coding
Why use Amazon Bedrock with Cline?
- Access to state-of-the-art models like Claude 4.5 Sonnet
- Pay-per-use pricing with no monthly subscriptions
- Enterprise-grade security and compliance
Prerequisites⌗
- AWS account with access console and Amazon Bedrock
- Access to CloudShell through the Console OR access to AWS CLI
- Cline extension installed in VSCode
Amazon Bedrock Set Up⌗
We will be using the AWS CLI to do the AWS part of the set up. The easiest way to use the CLI is through the CloudShell in the AWS Console, here is a getting started guide if you are not familiar with it.
1. Create IAM User⌗
If you already have a IAM user you want to use, you can skip to step 3.
If you don’t have an IAM user for API access, create one using the following cli command:
aws iam create-user --user-name bedrock-api-user
2. Attach Policy⌗
Attach the Bedrock access policy to your IAM user:
aws iam attach-user-policy \
  --user-name bedrock-api-user \
  --policy-arn arn:aws:iam::aws:policy/AmazonBedrockLimitedAccess
3. Generate Bedrock API Key⌗
Generate the API key for Bedrock in the CLI:
aws iam create-service-specific-credential \
  --user-name bedrock-api-user \
  --service-name bedrock.amazonaws.com
You should see a response like this:
{
  "ServiceSpecificCredential": {
    "CreateDate": "2025-10-15T03:25:38+00:00",
    "ServiceName": "bedrock.amazonaws.com",
    "ServiceCredentialAlias": "bedrock-api-user-at-672109488524",
    "ServiceCredentialSecret": "<YOUR_BEDROCK_API_KEY>",
    "ServiceSpecificCredentialId": "ACCA....",
    "UserName": "bedrock-api-user",
    "Status": "Active"
  }
}
ServiceCredentialSecret is your Bedrock API key. Copy and store it somewhere safe.
Cline Set Up⌗
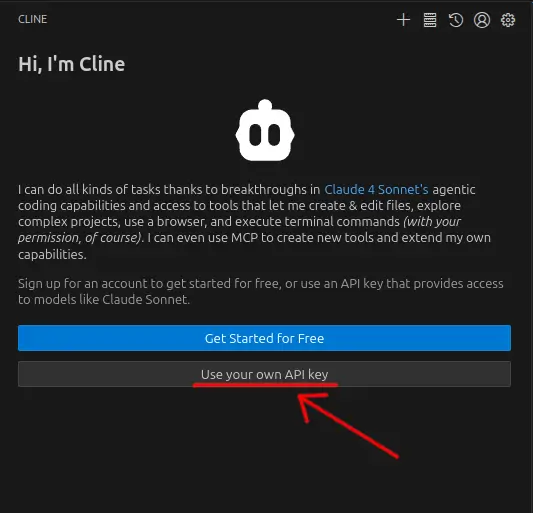
Click “Use your own API key”.
-
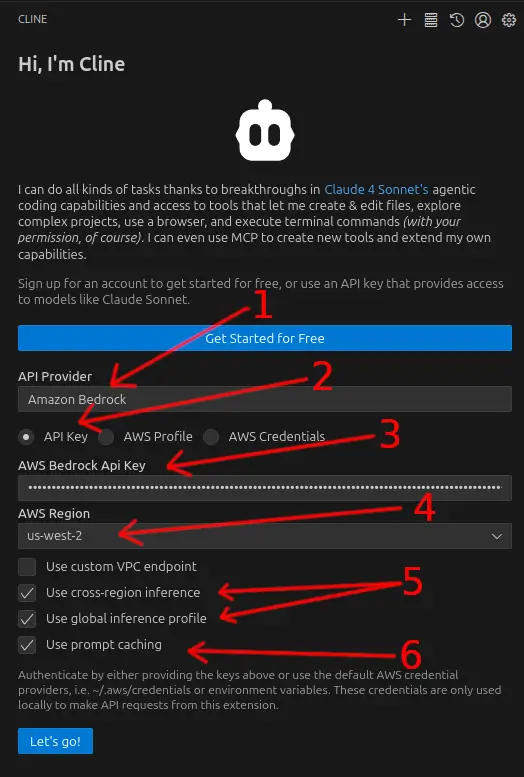
Select Amazon Bedrock as the API provider - This tells Cline to use Amazon Bedrock’s API endpoints instead of other providers like OpenAI or Anthropic direct.
-
Select API Key - To use the API key we generated.
-
Paste the ServiceCredentialSecret - Enter the API key we generated in the previous step. This is the long string that was returned as
ServiceCredentialSecretin the JSON response. -
Select your region - Choose the AWS region where you want to make your API calls. Select a region close to your location for lower latency, or one where you have other AWS resources. Popular options include
us-east-1orus-west-2. -
Enable cross-region inference and global inference profile - Cross‑region inference helps Cline automatically avoid regional quota limits by routing to other regions. The price per token remains the same as single-region inference, so it’s worth enabling. The global inference profile allows access to the latest model versions across regions.
-
Enable prompt caching - This feature caches parts of your conversation context to reduce costs and improve response times for subsequent requests. Since Cline often sends large amounts of code context, this can help reduce your bill.
Switching the model⌗
To change the model used or other settings, click on the text at the bottom as shown in the image below. This will pop up a hidden settings menu.
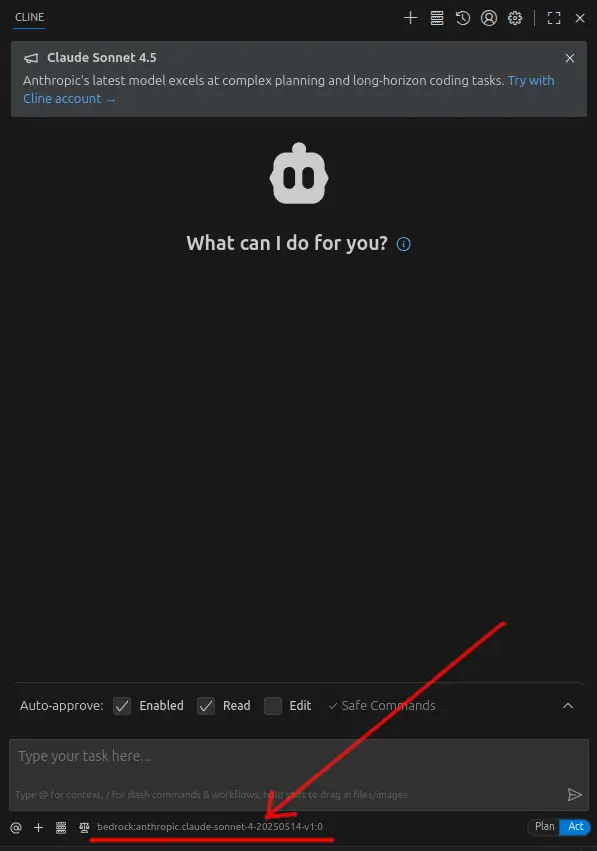
You can select different models that best suit the task you’re working on.
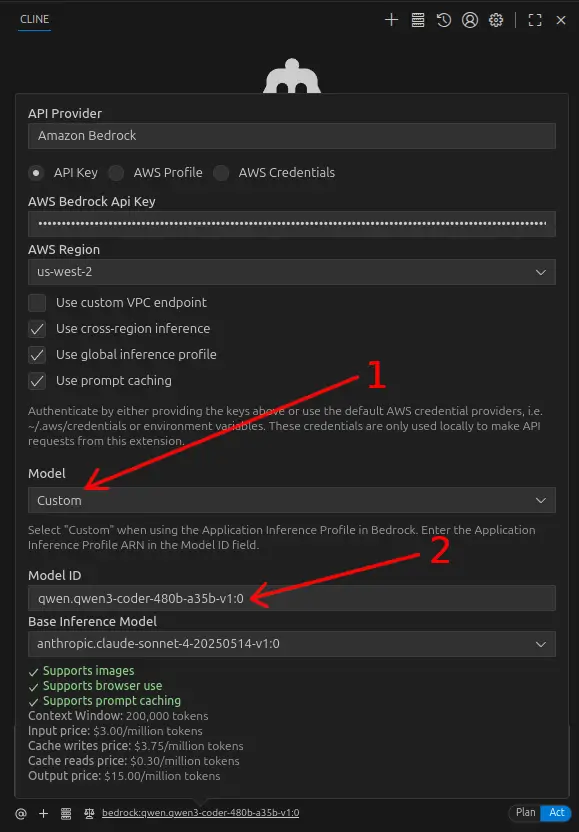
Using a custom model⌗
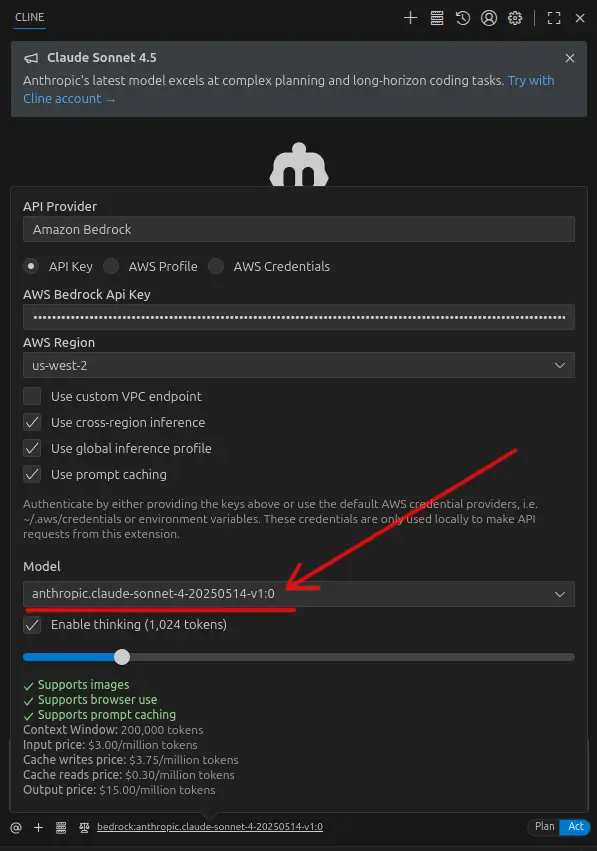
Not all models available on Bedrock show up in Cline’s model selection menu. To solve this we can set a custom model.
First we need the ID of the model in Bedrock. Here’s how to use the AWS CLI to list out all the models and their IDs that are available in a given region:
aws bedrock list-foundation-models \
  --region us-west-2 \
  --query "modelSummaries[].{ModelName:modelName, ModelId:modelId}" \
  --output table
Once you have the ID of the model you want to use, open up the model switching menu then set the following:
- For the model select “Custom”
- Paste in the model ID you copied earlier
Testing it out⌗
To check Cline is working, give it a simple prompt such as:
Please write a simple hello world script in Python
If everything is configured correctly, Cline should respond by creating a new Python file with a hello world script. You’ll see it thinking through the task, creating the file, and potentially even running it to verify it works.
Tips for working with Cline⌗
Git is your friend - Make sure to commit your code to Git before letting Cline loose on your code in case things go wrong and you need to roll back the changes.
Be specific with your requests - Instead of saying “fix this code”, explain what the issue is and what you want the code to do.
Provide context - If you’re working on a specific part of a larger project, mention the overall project structure and goals. You can use the “@” symbol in the message box to add specific context to your prompt.
Use incremental changes - For large refactoring tasks, break them down into smaller, manageable steps. (Don’t forget to commit to Git first)
Review Cline’s work - Always review the code Cline generates. While it’s generally very good, it’s important to understand what changes are being made to your codebase. You can also ask Cline about specific changes and discuss why the approach does or doesn’t work.
Cline works particularly well for web development, Python scripting, data analysis, and infrastructure as code projects. Experiment with different types of requests to see what works best for your workflow.
Happy coding!