AWS CDK - Cloud Development Environment
Table of Contents
What we are going to build
We are going to deploy a development environment in the cloud for AWS CDK (Cloud Deployment Kit).
The EC2 instance will be deployed in the default VPC (Virtual Private Cloud).
Why not AWS Cloud9?
This is more my personal opinion, I find it easier to work in VS Code for writing CDK.
Some advantages to VS Code over Cloud9.
- Vast ecosystem of extensions.
- Fast IntelliSense, which really speeds up CDK development.
- Useful for more than just AWS cloud development.
One big advantage to Cloud9 is it works out of the box. If you want to use Cloud9 you need not read any further since it has almost everything you need for CDK already. However if you are like me and find it clunky or just prefer working with tools your already familiar with then please read on.
Getting started⌗
Because this guide uses VS Code as the code editor you will need a copy of it installed on your local computer.
We will be using the Remote - SSH extension to connect the local VS Code to an EC2 instance running in the cloud where all the processing will happen.
Spinning up an EC2 instance⌗
We need to create an EC2 instance where CDK will run and where the development work will happen.
If you already have an EC2 instance spun up with an IAM role giving it access to create resources in your account, you can skip to the next step here.
Finding the image ID⌗
Fist we need to find an image to launch the EC2 instance from. This guide will use Ubuntu 22.04 due to it being easy to set up, but if you’re feeling adventurous you can try a Linux distro of your choosing, just note some commands may be different if you pick another distro.
If you want to deploy in a different region, add --region= to the region you want to launch in. Alternatively, if you are using the CloudShell it will default to whatever region is selected in the AWS Console.
Make a note of the ImageID, we will need this later
Breakdown of the describe-images command
- --owners = who owns the image, for example ‘self’ for your images or ‘amazon’ for official images
- --filters = getting only the info we are looking for
- name - filters based on the image name and uses wild-cards to fill in the unknown.
- ubuntu = name of OS
- 22.04 = release version of the OS
- server = find only the server version and not the minimal or pro versions.
- architecture - make sure its x86 for Intel/AMD CPUs. If you want to use ARM based Graviton instances change this to arm64
- name - filters based on the image name and uses wild-cards to fill in the unknown.
- --query = pulling the useful info out of the results
- sort_by(Images, &CreationDate)[-1] = get the latest verson
- {Name: Name, ImageId: ImageId} = return only the Name and ImageID
If you want to learn more here is a useful article from the makers of Ubuntu going into more detail about finding the right image via CLI
https://ubuntu.com/tutorials/search-and-launch-ubuntu-22-04-in-aws-using-cli#1-overview
Create new SSH keys⌗
To securely access the EC2 instance we need to create an SSH key.
If you already have an SSH key you can skip to the next step, just make sure to replace --key-name "cdkDevEnvKey" with the name of your key when starting the instance.
Note: If you are using powershell change the --output text value to | out-file -encoding ascii -filepath cdkDevEnvKey.pem.
This will create a new Private key called cdkDevEnvKey.pem that will be saved in the current directory.
Treat this key like you would any other password or secret and store it somewhere safe.
If you are on Linux or Mac OS change the permissions of the key so only your user account can access it.
It’s also a good idea to put it in a secure folder such as the .ssh folder in your home drive.
If the folder does not exist you can create it
Create security group⌗
We need to create a security group that lets you SSH in from your local computer to the EC2 instance.
First we need your public IP address. An easy way to do that is by going to this website https://ipinfo.io/ip
You can also get the IP from the command line using curl.
Now to create the security group itself using the AWS CLI.
Note: Make sure to write down the “GroupId” from the output of the command.
Add rules to the security group
Create admin IAM role⌗
The CDK dev environment needs access to deploy infrastructure into the AWS account. Typically this is done by creating a user account with programmatic access, however since we are running an EC2 instance in the account we want to deploy into we can simply give it an IAM role that grants it access to deploy infrastructure and avoid having to handle secret access keys.
Create a policy file to tell the role only EC2 can use it.
Create the IAM role and an instance profile so the role can be assigned to an EC2 instance.
Give the role admin access.
Spin up a new EC2 instance⌗
Put the ImageId from the previous command as the value for --image-id.
If you want to use Graviton change instance-type to t4g.medium
The set up of the EC2 instance is now finished, once in the instance spun up you can SSH in.
Configure development environment⌗
Start with updating the system.
CDK requires Node.js so lets install it from nodesource.
Install the AWS CLI
Install Python’s pip package manager and Python virtual environments
We need to set some environment variables so the dev environment knows the default location to deploy AWS resources.
Install CDK itself
Here is what the script looks like combined together.
Now that you know what all the parts of the script, you could use it as a user data script when launching the EC2 instance so it automatically sets up the environment.
VS Code set up⌗
To access the CDK development EC2 instance we need to install and configure the SSH extension in VS Code.
Start with opening VS Code.
- In the side tool bar, click on the extensions icon.
- Search for ‘ssh’.
- Install ‘Remote - SSH’ extension by Microsoft.
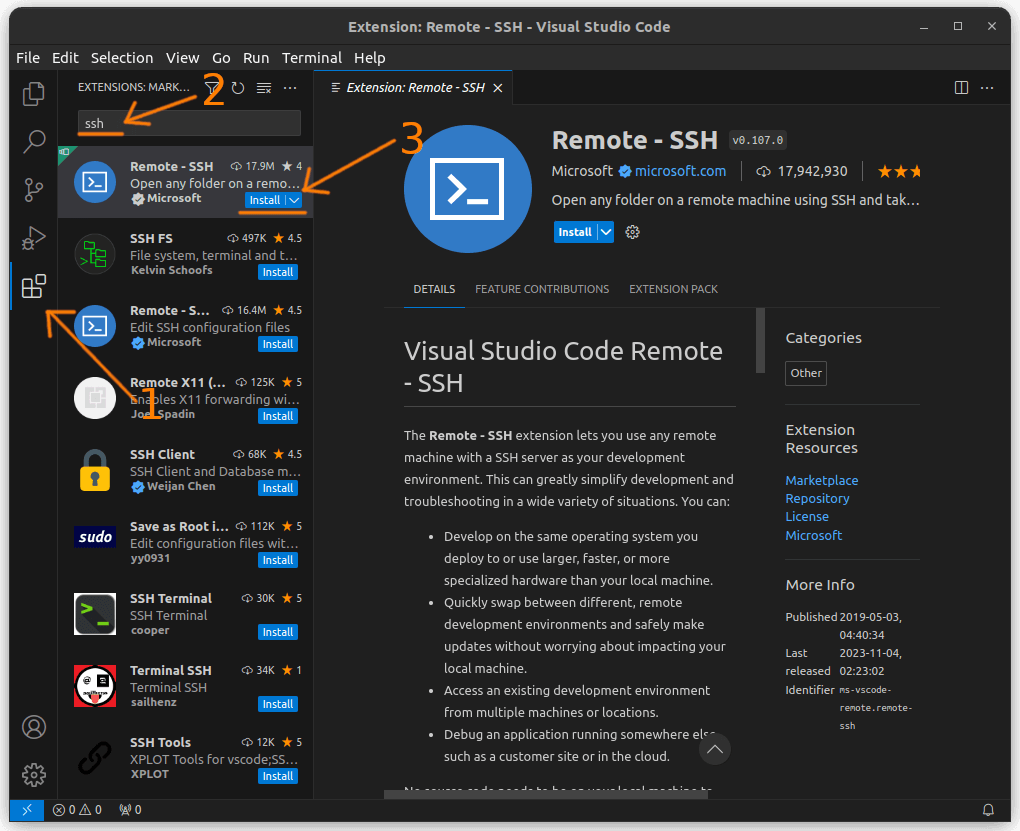
Once installed you’ll see a new icon on the side bar.
There are 2 options to add a new ssh connection.
1 - Click on the icon, then hidden in the ‘SSH’ drop down is a ‘+’ button to add a new host.
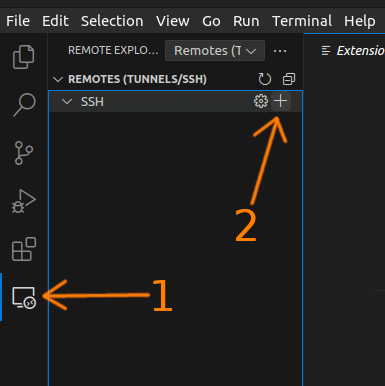
The command pallet will open and ask for the SSH command to run to access the remote system.
Enter ssh -i <path to ssh key> <username>@<ip address> -A as the ssh command. If you are using ubuntu the username will be ubuntu.

OR
2 - Using the command pallet (ctrl + shift + p).
Type in >add new ssh host then hit enter.

Enter the ssh command to access the remote system, same as option 1.
ssh -i <path to ssh key> <username>@<ip address> -A

VS Code will ask where to save the SSH command, choose your home drive as the location to save it.
For example if your username is ‘luigi’ and you are using Linux save the config in /home/luigi/.ssh/config

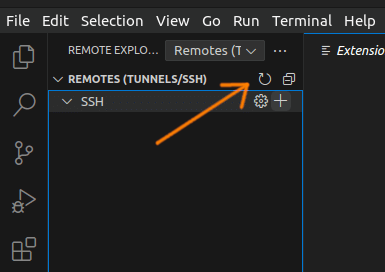
You may need to hit the refresh button for the new connection to show up.
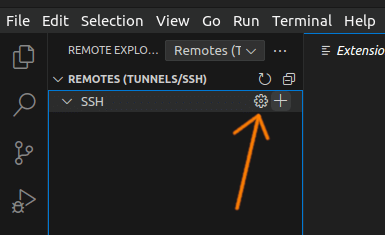
If you need to edit the connection you can hit the gear icon and open the settings file.
You can now connect to the EC2 instance by clicking the arrow icon.
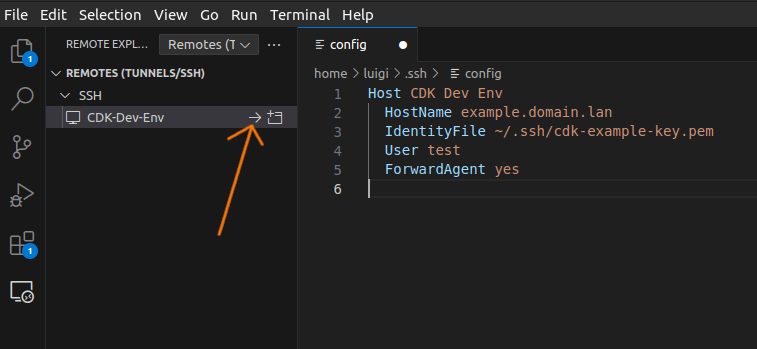
New CDK project quick start⌗
In VS Code at the top menu bar click on Terminal -> New Terminal to open a new terminal panel.
Create a new folder with the name of the CDK project you want to make, then change into it.
Initialise a new cdk project.
If you want to learn more about CDK there is an excellent workshop here. https://cdkworkshop.com/
Optional extras⌗
RFDK (Render Farm Deployment Kit)⌗
RFDK lets you quickly deploy a Deadline render farm in the cloud. RFDK is built on top of CDK so you already have everything you need to get started.
Here is a template to help get your render farm up and running quickly.
Adding Terraform⌗
You can learn more about Terraform here.
Install the CLI.
Install CDKTF (CDK for Terraform)
Git⌗
Don’t forget to set your git username and email
git config --global user.name "Your Name"
git config --global user.email "youremail@yourdomain.com"
What next?⌗
If your still hungry for more you can check out this amazing workshop that guides you step by step in using CDK